Many modern Smartphones have a pretty good camera but the storage space sometimes is small and you can’t store you high quality footage on them. But you can upgrade that storage over LAN without any storage limits.
Android phones are basically machines with a Linux kernel; which enables us to do so many amazing things that so many companies are hiding from You!
Tools that I use in this tutorial do require you android device to be rooted.
For this tutorial, I’m going to use basic remote control Linux tools on an android phone to mount a remote storage drive on the phone; therefore increasing the storage on the phone over LAN! Here are the steps to do so:
1.Root Your Phone:
First of all, you need to root your phone. You can do this in many ways; one of them is by installing a custom recovery, then use a zip to root your phone, you can easily do this by visiting xda-developers forum and search for your phone.
2.Install the Required Programs:
There are a few programs that you need to install to make this work: easySSHFS – opencamera – any file explorer of your choice. and that’s all the apps you need.
3.Acquire the Needed components:
The components you need are of course, your android phone and a Linux Box/Machine with some storage on it; this Box can be a complete PC build or a raspberry pie with external/or the default sdcard storage on it, so you can carry it anywhere while it being an access point! This machine/linux box also needs to be connected to the same network as the phone is connected to!
4.Mount the FileSystem:
After you setup the LinuxBox/server, we can move onto mounting the FileSystem on the phone:
A)Make a directory on the device to mount the FileSystem:
Use any file explorer to make a Directory in the “Internal Storage”(this will normally be the /storage/emulated/0 directory; but if you use a GUI, don’t even bother.).
I named it “mnt” so that it’s Relevant through out the tutorial; but you can name it whatever you want.
B)Open up the “EasySSHFS” program and set up the the address, certificates, direcrtories and such:
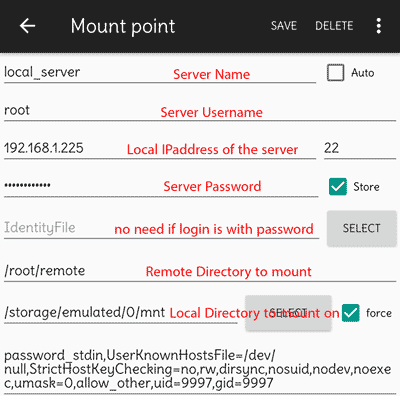
The Local directory in the picture is the “mnt” directory I made earlier. And the Remote directory in the picture is what I made on the server to keep things organized and safe. You have to enter all the others yourself!
Right after those, save the stuff you just did and click on Mount. If everything went well, it should say “mounted”: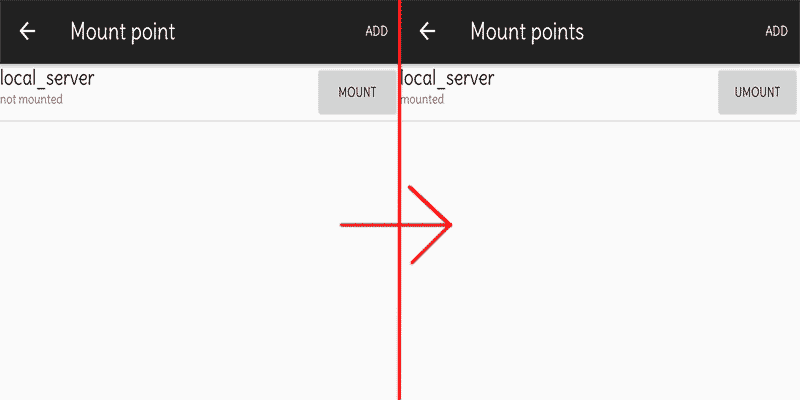
If it doesn’t say “mounted”, check the logs and see what’s wrong; but there won’t be any errors if you followed the tutorial correctly.
Now the files on the remote Linux server are available on your android phone.
5.Configure the OpenCamera App:
Now that we’ve set up the remote directory via SSHFS; we need to configure a camera app to use the mounted remote directory. A good option i found compatible with support of using a mounted remote directory was OpenCamera, an opensource camera app with standard features.
The app is ready as installed but there are some minor changed that need to be made:
A)Change the save directory:
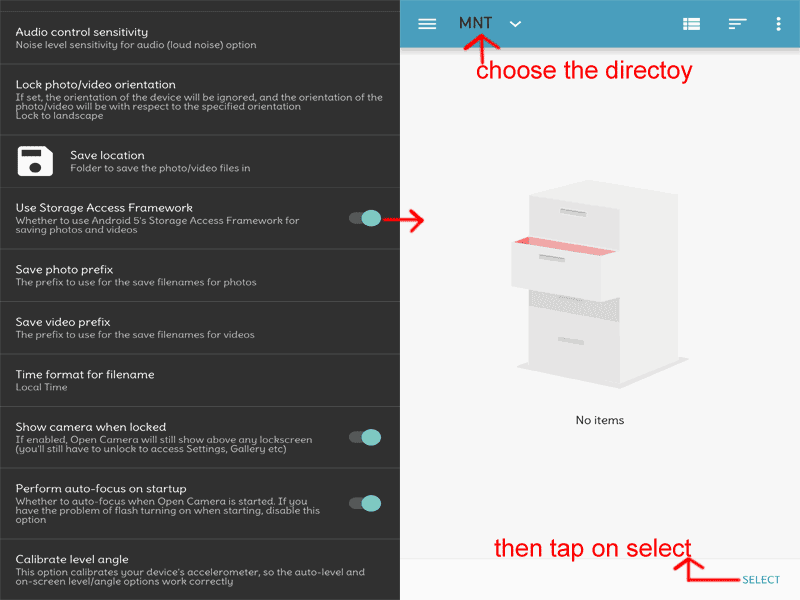
Go into “app Settings -> More camera controls -> Save location” and and change the save path to the directory we mounted earlier;
do this by clicking on “Use Storage Access Framework” and selecting the directory using the file manager it gives you:
*Remember that this part is critical to making this work!*
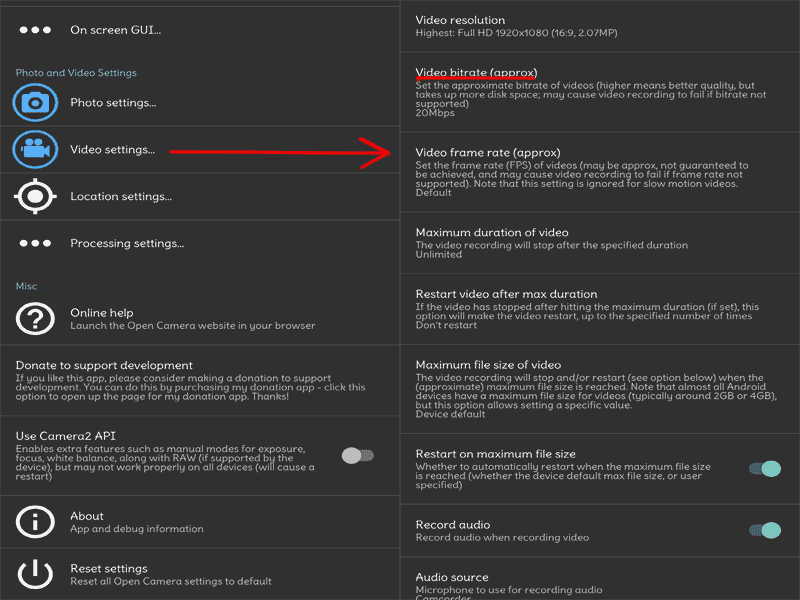
B)Change the Bitrate for recording:
Since this is done in LAN, the recording might suffer from poor wifi speeds and a high Bitrate can overheat the phone; So the Bitrate needs to be changed in order to be safe. So do the following:
Go into “app Settings -> Video settings -> Video bitrate (approx)” and change it to anything from 40mbps to 70mbps which is the maximum speed that most smartphones support on their wireless chip.
After this, you’re all set to record from OpenCamera and save it in the remote server directory that was mounted without worrying about your device running out of storage and such.
-Tweaking the OpenCamera app for better camera quality:
If you leave the OpenCamera app untouched, then you’re missing most of the great features it gives you.
Using the “Camera2 API” gives you better control over the camera hardware and uses its full potential: It gives you more control over the Resolution, Noise reduction, Edge enhancement, etc.
Go into the Settings and tap on “Use Camera2 API” and enable it if your device supports it, close and open the app again. Now you can change the resolution in “Video Settings” to the amount that your camera hardware supports and also you can change other useful settings in the “Processing settings” which The “Camera2 API” enabled