There are many mailing services You can choose from but nothing can be like what You make yourself. In this tutorial I’m going to set up a Mail server using Dovecot and Postfix on an Ubuntu server.
Also I’m going to setup certificates using the openssl for Digitally Sign and Encrypt outgoing emails so they won’t end up in the Spam folder of Gmail and other mailing services.
1. Use of each program
2. Adding DNS records
3. Edit the hostnames
4. Installing the required programs
5. Making certificates and keys
6. Configuring Postfix
7. Configuring Dovecot
8. Configuring OpenDKIM
9. Setting up a client
10. Sources
1. Use of each program
Postfix is used for sending emails using the SMTP protocol which can also be used with keys and certificates to encrypt and sign the emails.
Dovecot is used for receiving emails either over IMAP(For remotely using emails) or POP3(For locally/remotely using emails). I will be using IMAP.
openDKIM is used to detect email spoofing to avoid phishing and scamming; this is done by storing a public key in a TXT DNS record.
OpenSSL will be used to make keys and certificates to secure the mail transfer and sign the email.
2. Adding DNS records
This is an most important step in creating a mail server! We have to add an MX, A, a TXT SPF and another TXT DMARC record to our domain by using the DNS manager that you have. if you don’t have access to it; ask the support staff to add them for you or google it for your provider.
Adding the MX record:
Just leave the Name empty and fill out Content with mail.example.com with example being your own domain name, of course.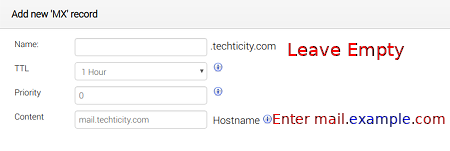
Adding the A record:
Set the Name to mail and set Content to your server’s IP address. This is needed so mail.example.com will resolve to an IP address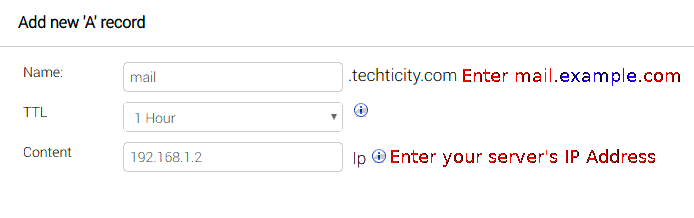
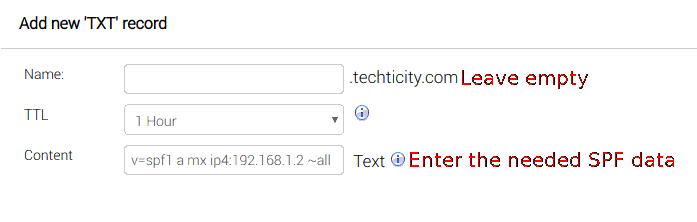
Adding the SPF record:
Sender Policy Framework or SPF for short is an email validation system designed to prevent email spam by detecting email spoofing, a common vulnerability, by verifying sender IP addresses; so we add the IP address and to a TXT record:
The TXT record Content should be as following:
replace 192.168.1.2 with your server’s ip address
v=spf1 a mx ip4:192.168.1.2 ~all
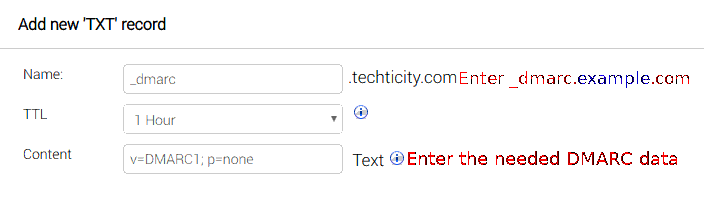
Adding the DMARC record:
To indicate that the domain name is using an SPF record, a TXT DMARC record is needed. This record will also be used to indicate using a DKIM signature which will be set up later in the tutorial.
The Name would be ‘_dmarc’ and The needed Content to add is:
v=DMARC1; p=none
3. Editing the hostnames and mailname
This is a pretty important step for creating an email server, so emails are verified by the hostname. The /etc/hosts, /etc/hostname and the /etc/mailname files:
/etc/hosts:
# Replace 192.168.1.2, example.com and example with your own IP Address, Domain Name and Hostname
192.168.1.2 example.com example
127.0.0.1 localhost.localdomain localhost
::1 localhost.localdomain localhost
/etc/hostname:
example.com # Replace example.com with your own domain name
/etc/mailname:
example.com # Replace example.com with your own domain name
4. Installing the required programs
First update the package manager; then install openssl, dovecot, postfix and opendkim here’s the procedure:
To update the apt package manager:
sudo apt-get update
Installing the programs:
sudo apt-get install dovecot-core postfix opendkim opendkim-tools openssl
while installing postfix, it will prompt you with a TUI to choose an option; press No Configuration. If it doesn’t give you the blue TUI to choose an option, enter ‘sudo dpkg-reconfigure postfix’. Although it’s unlikely to happen while installing for the first time.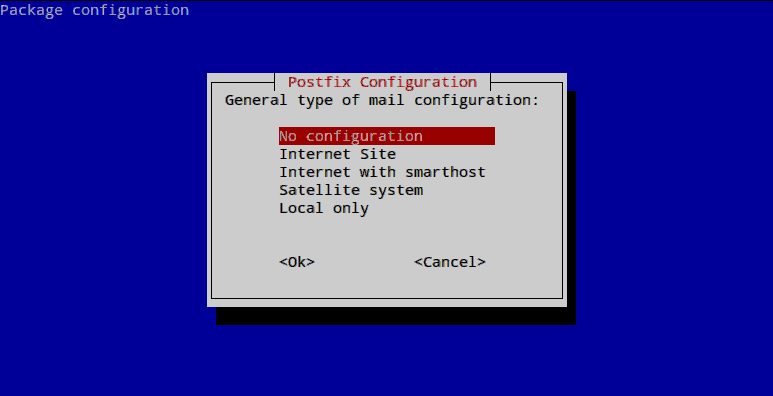
5. Making certificates and keys
If outgoing emails are not signed or encypted; they will end up in the spam folder instead of inbox of many mail providers. Certificates and keys need to be made with the openssl program and used in postfix and dovecot configs.
First, make a new directory and go into it:
mkdir ~/mailcerts; cd ~/mailcerts
Then use the openssl command to make the key needed:
you will be asked for a password; enter a strong password and remember it!
openssl genrsa -des3 -out mail.domain.tld.key 2048
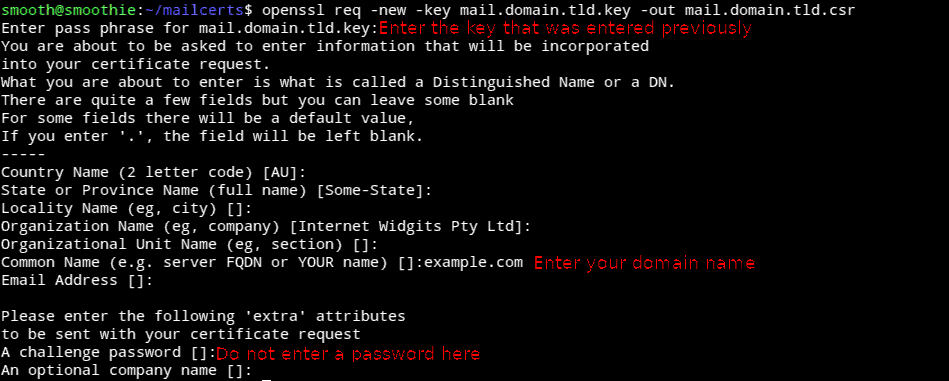
Now we have to generate a Certificate Signing Request file:
Enter the password that was set earlier and skip entries with ENTER until you get to ‘common name’ which has to be your domain name!
openssl req -new -key mail.domain.tld.key -out mail.domain.tld.csr
Now a self-signed key needs to be generated:
It will ask for the previously entered password.
openssl x509 -req -days 365 -in mail.domain.tld.csr -signkey mail.domain.tld.key -out mail.domain.tld.crt
Now we have to remove the password from the private key file so postfix won’t ask for a password after a restart:
it will ask for the previously entered password.
openssl rsa -in mail.domain.tld.key -out mail.domain.tld.key.nopass
And now we have to replace the created file with the old file
mv mail.domain.tld.key.nopass mail.domain.tld.key
Now it’s time to make a Trusted Certificate Authority; This is the file used to encrypt the emails via a TLS handshake when sending emails to Gmail and other mailing services.
it will ask for a password
openssl req -new -x509 -extensions v3_ca -keyout cakey.pem -out cacert.pem -days 3650

All the certificates and keys needed are created; Now we have to give them proper permissions and place them in the /etc/ssl directory; To do so, enter the following commands:
sudo mkdir -p /etc/ssl/private/; sudo mkdir -p /etc/ssl/certs/; sudo chmod 600 mail.domain.tld.key; sudo chmod 600 cakey.pem; sudo cp mail.domain.tld.key /etc/ssl/private/; sudo cp mail.domain.tld.crt /etc/ssl/certs/; sudo cp cakey.pem /etc/ssl/private/; sudo cp cacert.pem /etc/ssl/certs/
6. Configuring Postfix
Setting up the aliases:
The /etc/aliases file needs to be edited in order to redirect emails to local users.
Before editing the file; a new user needs to be made in order to redirect the emails to.
The file should look like this:
mailer-daemon: postmaster
postmaster: shayanthethief # Replace with the user you want your mail for
nobody: root
hostmaster: root
usenet: root
news: root
webmaster: root
www: root
ftp: root
abuse: root
Now that everything needed is done, config files need to be edited in order to run correctly. The files that need to be edited are /etc/postfix/main.cf and /etc/postfix/master.cf.
The /etc/postfix/main.cf should look like this:
myhostname = example.com #replace with your own domain name
myorigin = /etc/mailname
mydestination = $myhostname, localhost
mynetworks = 127.0.0.0/8 [::ffff:127.0.0.0]/104 [::1]/128
mailbox_size_limit = 0
recipient_delimiter = +
inet_interfaces = all
alias_maps = hash:/etc/aliases
alias_database = hash:/etc/aliases
# SSL Stuff
# Pointing out the Key and the Cetificate that was made earlier
smtpd_tls_cert_file = /etc/ssl/certs/mail.domain.tld.crt
smtpd_tls_key_file = /etc/ssl/private/mail.domain.tld.key
smtpd_use_tls = yes
smtp_tls_loglevel = 1
smtpd_tls_loglevel = 1
smtpd_tls_auth_only = no
tls_random_source = dev:/dev/urandom
smtp_tls_CAfile = /etc/ssl/certs/cacert.pem
smtpd_tls_session_cache_database = btree:${data_directory}/smtpd_scache
smtp_tls_session_cache_database = btree:${data_directory}/smtp_scache
smtpd_tls_security_level = may
smtp_tls_security_level = may
smtpd_tls_protocols = SSLv3, TLSv1, !SSLv2
smtpd_tls_cipherlist = ALL:!ADH:RC4+RSA:+HIGH:+MEDIUM:-LOW:-SSLv2:-EXP:-eNULL
smtp_tls_cipherlist = ALL:!ADH:RC4+RSA:+HIGH:+MEDIUM:-LOW:-SSLv2:-EXP:-eNULL
local_recipient_maps = proxy:unix:passwd.byname $alias_maps
mailbox_command = procmail -a "$EXTENSION"
inet_protocols = ipv4
# Milter configuration for OpenDKIM
milter_default_action = accept
milter_protocol = 2
smtpd_milters = inet:127.0.0.1:8891
non_smtpd_milters = $smtpd_milters
7.Configure Dovecot
Now that Postfix is configured; it’s time to move on to configuring Dovecot which receives emails.
The file that needs to be edited is /etc/dovecot/dovecot.conf ; First of all, the file needs to be cleared out i.e. Deleting every piece of text in it; Then put the following configuration in it:
disable_plaintext_auth = no
mail_privileged_group = mail
mail_location = mbox:~/mail:INBOX=/var/mail/%u
userdb {
driver = passwd
}
passdb {
args = %s
driver = pam
}
protocols = " imap"
protocol imap {
mail_plugins = " autocreate"
}
plugin {
autocreate = Trash
autocreate2 = Sent
autosubscribe = Trash
autosubscribe2 = Sent
}
service auth {
unix_listener /var/spool/postfix/private/auth {
group = postfix
mode = 0660
user = postfix
}
}
ssl=required
ssl_cert = </etc/ssl/certs/mail.domain.tld.crt
ssl_key = </etc/ssl/private/mail.domain.tld.key
8.Configuring OpenDKIM
For configuring OpenDKIM; There are more steps to it; New keys need to be made and it’s not only one config file.
Make a new directory for OpenDKIM:
sudo mkdir -p /etc/opendkim/keys/example.com
Go to that directory:
sudo cd /etc/opendkim/keys/example.com
Making the keys:
sudo opendkim-genkey -b 2048 -d example.com -s default -v
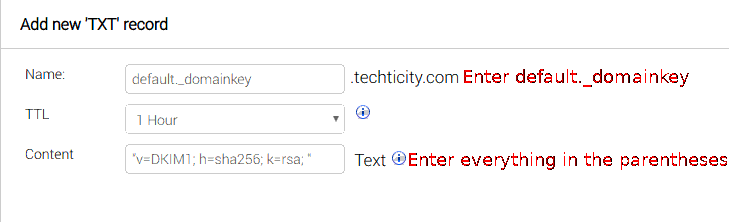
This will generate two files; One with the private key(default.private) which should be kept secret and the public key(default.txt) which needs to be put into the TXT record just like how the earlier records were made but with the default._domainkey name:
Everything inside the parentheses needs to be put in the content part of the TXT record: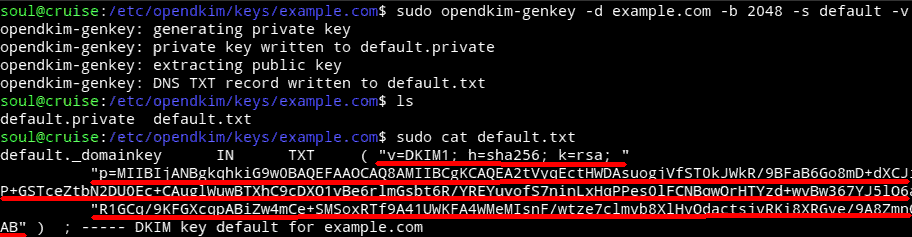
Making a new user for DKIM and setting the home directory:
sudo useradd -r -g opendkim -G mail -s /sbin/nologin -d /var/run/opendkim -c "OpenDKIM" opendkim
Add postfix to the opendkim group:
gpasswd -a postfix opendkim
Setting ownership of the home directory to the user:
chown opendkim:opendkim /var/run/opendkim
Then giving read,write and execute permission to it
sudo chmod 700 /var/run/opendkim
Setting ownership for /etc/opendkim :
chown -R opendkim:opendkim /etc/opendkim
Settings permission for /etc/opendkim/keys :
chmod -R go-wrx /etc/opendkim/keys
Now it’s time to edit the config files for OpenDKIM; which are /etc/default/opendkim and /etc/opendkim.conf.
***Clear out or comment everything in the /etc/default/opendkim file because it will overwrite the options in /etc/opendkim.conf.***
Put the following configuration inside /etc/opendkim.conf:
Syslog yes
UMask 002
Canonicalization relaxed/simple
Mode sv
SubDomains no
AutoRestart yes
AutoRestartRate 10/1M
Background yes
DNSTimeout 5
SignatureAlgorithm rsa-sha256
OversignHeaders From
TrustAnchorFile /usr/share/dns/root.key
UserID opendkim
KeyTable /etc/opendkim/key.table
SigningTable refile:/etc/opendkim/signing.table
ExternalIgnoreList /etc/opendkim/trusted.hosts
InternalHosts /etc/opendkim/trusted.hosts
Socket inet:8891@127.0.0.1
Making and editing /etc/opendkim/signing.table , /etc/opendkim/key.table , /etc/opendkim/trusted.hosts.
Make the following files and edit them one by one:
Contents of the /etc/opendkim/signing.table should be as the following:
*@example.com default._domainkey.example.com
Contents of the /etc/opendkim/key.table should be as the following:
default._domainkey.example.com example.com:default:/etc/opendkim/keys/example.com/default.private
Contents of the /etc/opendkim/trusted.hosts should be as the following:
127.0.0.1
localhost
example.com
*.example.com
Restart all the services:
After all the configuration; every program needs to be restarted:
sudo service postfix force-reload; sudo service dovecot force-reload; sudo service opendkim force-reload
9.Setting up a client
In this tutorial, I’m going to use ThunderBird; because it’s opensource and easy to use.
All you have to do to configure it; is to click on Set up an account and then enter your credentials. After pressing Continue; the program will try to pull the configuration from the server; which it’s not that good at; do the following configuration for the best: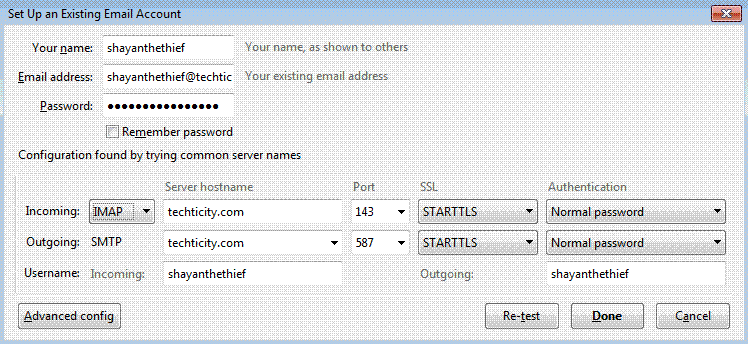
If this is set; then it will ask you if you want to confirm exceptions; which you will have to.
This is the way it is because the certificates that were used for the domain name (example.com) were not used for the email address; so they will be needed to be confirmed for exception. However this is totally fine and will not compromise security.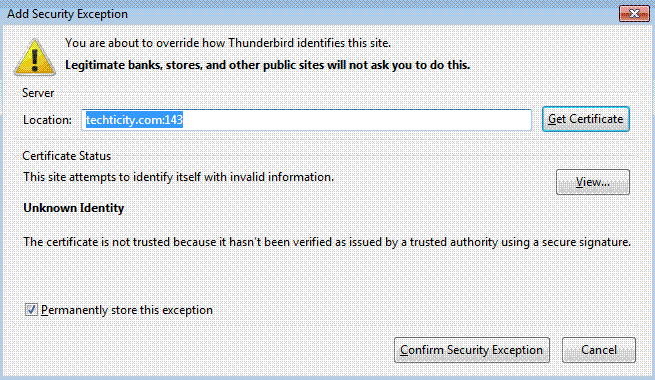
This will also show up for SMTP when you try to send a message but it’s fine if you confirm it: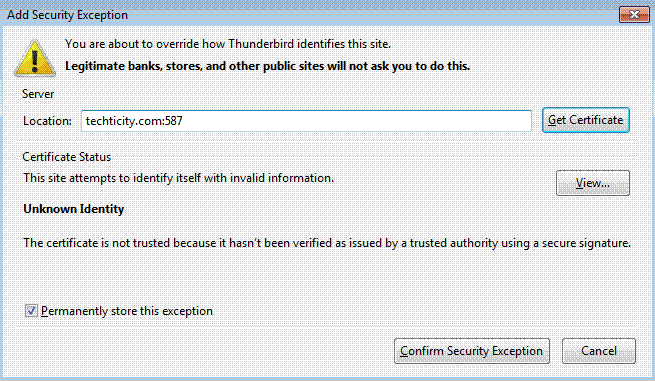
10.Sources
I’ve been trying to do this project for my personal usage but the tutorials were pretty incomplete and I had to do a million google searches to make a little part happen. So I gathered everything that I did and learned to an article; Here are the many sources that I used:
- Many DigitalOcean tutorials
- Infopackets.com Without this, the tutorial would not be possible.
- StevenJenkins.com OpenDKIM
One reply on “How to create a Mail server with SSL/TLS on Linux”
thanks for this nice and useful tutorial